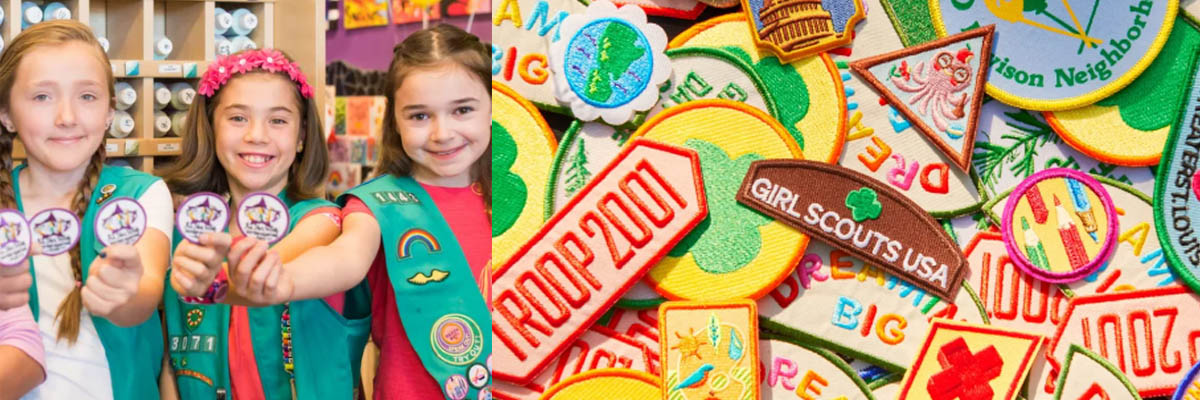
Elevate Your Troop’s Spirit with Premium Custom Girl Scout Patches
Exhibit your troop’sidentity and accomplishments in the Girl Scouts of the United States of America with our premium custom Girl Scout patches. These tailor-made patches can mirror your personal interests, skills, and achievements. They are the perfect accessory for your Girl Scout uniform or backpack. Our custom Girl Scout patches enable you to showcase your rank, badges, leadership roles, and various achievements.
The Distinctive Characteristics of Boy Scout Patches and Girl Scout Patches
Boy Scout and Girl Scout patches convey a shared core belief of leadership, community service, and outdoor activities. However, there exist striking differences in the customization of patches for both organizations.
Colors:
Girl Scout patches carry a bright and vibrant color palette, emphasizing on shades of green, pink, purple, and blue. These colors represent the organization’s commitment towards creating a welcoming environment for girls to acquire new skills and delve into new interests. In contrast, Boy Scout patches use more muted tones like tan, brown, and olive green, reflecting the organization’s focus on outdoor activities and survival skills.
Images:
Girl Scout patches often include images reflecting the interests and activities of girls, such as flowers, animals, or sports. The patch designs aim to inspire and encourage girls to follow their interests and develop new skills. In contrast, Boy Scout patches lean towards a rugged aesthetic, featuring images of camping gear, wildlife, and military insignia to represent their emphasis on outdoor activities and leadership development.
Themes:
Girl Scout patches can be designed around themes that represent the interests and goals of girls. They can showcase your troop, council, or region and also depict achievements in community service, environmental conservation, or STEM education. The themes selected represent the organization’s dedication to empowering girls to actively contribute to their communities and have a positive global impact. On the other hand, Boy Scout patches are generally focused on outdoor activities like camping, hiking, and survival skills, emphasizing their commitment towards leadership development and self-reliance.
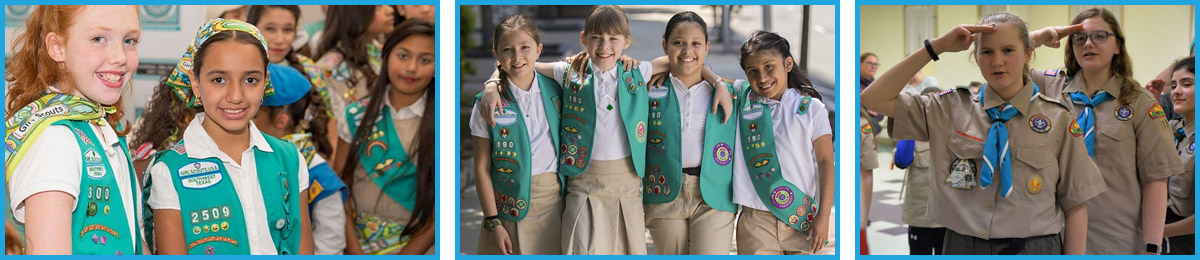
Perfect Placement of Custom Girl Scout Patches
Girl Scout patches symbolize numerous achievements, and their proper placement on a Girl Scout uniform is crucial. Here are some guidelines for the right placement of Girl Scout patches:
- Girl Scout Council Identification Set: This should be worn on the front of the uniform directly below the left shoulder seam. The set includes the council identification strip and the troop number.
- Troop Crest: It should be placed below the council identification set.
- Membership Stars and Discs: These are to be worn on the uniform’s right side. Stars represent the number of years a Girl Scout has been a member, while the discs represent her grade level.
- Badges: Girl Scout badges are to be placed on the front of the uniform, either on the sash, vest, or tunic, depending on the type of uniform. They should be arranged in the following order: Journey Summit Award or Girl Scout Gold Award (if earned), Brownie Wings (if earned), Girl Scout Cookie Activity pin (if earned), Girl Scout Bronze Award (if earned), Bridge to Girl Scout Junior Award (if earned), Junior Aide Award (if earned), Junior Girl Scout badges, Cadette Girl Scout badges, Senior Girl Scout badges, Ambassador Girl Scout badges.
- Pins and Insignia: These should be worn on the front of the uniform and can be placed on the sash, vest, or tunic, depending on the uniform type.
With these guidelines, you can correctly position your Girl Scout patches on your uniform, ensuring they are visible and easily understood.
Methods to Attach Custom Girl Scout Patches Without Sewing
Here are several non-sewing ways to attach Girl Scout patches:
- Iron-On Adhesive: An iron, a piece of fabric, and a patch are required for this method. Place the patch on the fabric, adhesive side down, with a thin cloth or towel over the patch to protect it from the iron’s heat. Heat the patch with the iron for around 30 seconds, let it cool, and test by gently tugging the edges.
- Fabric Glue: Apply a small amount of fabric glue to the back of the patch and press it onto the fabric. Once the glue dries, test the patch by gently tugging it on the edges.
- Badge Magic: Designed specifically for attaching patches, cut a piece of Badge Magic to fit the size of your patch. Attach one side of the Badge Magic to the back of the patch and the other side to the fabric. Press firmly to ensure adherence.
- Velcro: Suitable for patches that require frequent removal and reattachment. Attach one side to the back of the patch and the other to the fabric. Velcro makes it easy to remove and reattach the patch as needed.
Please follow the manufacturer’s instructions for the specific adhesive product you are using. Always test the patch before wearing it to ensure it’s securely attached to the fabric.
Why Choose Us?
We manufacture top quality custom with no minimum and are guaranteed at the lowest price.
Super Quality
- OEKO-TEX100 standard threads and Twill fabric for all embroidered patches.
- Every size, shape, and colour you could imagine for all custom make patches.
- 100% machine washable, and our embroidered patches that never fade.
Order Included
- Free shipping cost to the USA and Europe via DHL, FedEx and UPS.
- Free Full Color embroidered patches Proof delivered via email within 2-3 days.
- Free unlimited samples revision for embroidered patches until you are satisfied.
Fast Turnaround
- Embroidered patches custom Samples will be done in 24-36 hours.
- Standard orders custom embroidered patches will be done on 5-7 days.
- Rush orders for custom made patches can be done on 3-5 days.
Frequently Asked Questions
The term “embroidery percentage” refers to the amount of the patch covered by the embroidery design. If your design has many open spaces and few details, the embroidery percentage will be lower. On the other hand, if your design is more intricate and covers more of the patch, the embroidery percentage will be higher. The embroidery percentage is an important factor in determining the price of embroidered patches, as a higher percentage requires more time and materials to produce.
Embroidered custom patches are intricate pieces of artwork created by an embroidery machine using polyester twill and different threads. They are typically designed to convey a message, theme, event, or logo for individuals or groups. These patches can be affixed directly onto clothing or used in scrapbooks. The twill fabric serves as the main background for the design, while other colours and stitches are used to create intricate details. The overcasting stitch is used to overlay the edges of the twill fabric, making outlining easier. Embellished patches are commonly worn by police officers, firefighters, military personnel, girl scouts, boy scouts, security guards, soccer players, college students, and many more. Embroidered custom patches can be applied through several methods, such as sew-on, iron-on, velcro, or adhesive glue.
- Place the patch on the clothing item and cover it with a thin cloth to prevent scorching.
- Adjust the iron to a temperature of 150°C and place it on top of the patch. Apply pressure and move the iron back and forth for about 20-30 seconds.
- Repeat the pressing process on the other side of the garment, again using a cloth to avoid any damage to the garment.
- Wait until the patch and garment have cooled down completely before handling. This will ensure that the patch has properly adhered to the garment.
Merrowed and stitch borders (heat-cut borders) are two types of patch borders used in the custom patch industry. A merrowed border is created by sewing a specific kind of thread around the edge of the patch, which creates a seal and prevents the outer threads from puckering out. This type of border is suitable for regularly shaped patches such as circles, rectangles, diamonds, and triangles. On the other hand, the heat-cut border allows for patches with complex edges, and the edge of the patch is cut with a hot knife to seal the threads, preventing fraying. The heat-cut border is perfect for patches with custom shapes or irregular borders. Ultimately, the choice between merrowed and heat-cut borders is a personal preference and depends on the design and shape of the patch.
When it comes to attaching patches to garments, ironing is a quick and easy method. If you’re concerned about the patch coming off after ironing, you can always sew it on as well. However, if you follow our ironing instructions properly, the patch should stay in place. For a more permanent attachment, sewing is the better option.
An embroidery is a form of art, and as with any art, slight variations can occur. Unlike printing, where the design can be replicated precisely, embroidery is a different medium that relies on threadwork. Factors such as the weather can even affect the outcome of the design. However, you can rest assured that we will send you a mock-up and sewn-out sample via email for your approval before proceeding with production so that you can confirm the final product.